这此主要是分析发送数据到客户端的部分以及buffering状态下,nginx接收upstream数据的部分,这也是upstream的最复杂的部分,这里我还是忽略了cache部分,以后我会专门写blog来分析nginx的cache部分。
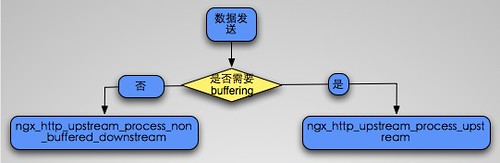
这部分的函数入口是ngx_http_upstream_send_response,这里有一个很重要的标记,那就是u->buffering,这个标记的含义就是nginx是否会尽可能多的读取upstream的数据。如果关闭,则就是一个同步的发送,也就是接收多少,发送给客户端多少。默认这个是打开的。也就是nginx会buf住upstream发送的数据。
不管buffering是否打开,后端发送的头都不会被buffer,首先会发送header,然后才是body的发送,而body的发送就需要区分buffering选项了。如下图所示:
下面这部分就是开始发送header,通过调用 ngx_http_send_header最终进入header filter的处理.
1
2
3
4
5
6
7
8
9
10
rc = ngx_http_send_header(r); if (rc == NGX_ERROR || rc > NGX_OK || r->post_action) { ngx_http_upstream_finalize_request(r, u, rc); return; }
然后就是发送body部分,这里我们先来看buffering被关闭的情况,这里有两个要注意的回调函数,分别是input_filter/input_filter_init,这个filter回调指的是对upstream发送给nginx的数据将要发送前的filter(严格来说是一个body filter).这里如果input_filter没有被设置,则nginx会有默认的回调.后面我们会分析这个默认的filter,以及这个filter具体是需要操作那个数据。要注意,这两个回调都只是针对buffering被关闭的情况,而对应buffering打开的时候的情况,有另外的hook,我们后面会分析到.
1
2
3
4
5
6
7
8
9
10
11
12
13
14
15
16
17
18
19
20
21
22
23
24
25
26
27
28
29
30
31
32
33
34
35
36
37
38
39
40
41
42
43
44
45
46
47
48
49
50
51
52
53
54
55
56
57
58
59
60
61
62
63
64
65
66
67
68
69
70
71
72
73
74
75
76
77
78
79
80
81
82
83
84
85
86
87
88
89
90
91
92
93
94
95
96
97
98
99
100
101
102
103
104
105
106
107
108
109
110
111
112
113
114
115
116
117
118
119
120
121
122
if (!u->buffering) { //如果input_filter为空,则设置默认的filter if (u->input_filter == NULL) { u->input_filter_init = ngx_http_upstream_non_buffered_filter_init; u->input_filter = ngx_http_upstream_non_buffered_filter; u->input_filter_ctx = r; } //设置读写函数 u->read_event_handler = ngx_http_upstream_process_non_buffered_upstream; r->write_event_handler = ngx_http_upstream_process_non_buffered_downstream; r->limit_rate = 0; //调用input filter 初始化函数 if (u->input_filter_init(u->input_filter_ctx) == NGX_ERROR) { ngx_http_upstream_finalize_request(r, u, 0); return; } //打开nodelay,准备将数据完全发送出去 if (clcf->tcp_nodelay && c->tcp_nodelay == NGX_TCP_NODELAY_UNSET) { ngx_log_debug0(NGX_LOG_DEBUG_HTTP, c->log, 0, "tcp_nodelay"); tcp_nodelay = 1; if (setsockopt(c->fd, IPPROTO_TCP, TCP_NODELAY, (const void *) &tcp_nodelay, sizeof(int)) == -1) { ngx_connection_error(c, ngx_socket_errno, "setsockopt(TCP_NODELAY) failed"); ngx_http_upstream_finalize_request(r, u, 0); return; } c->tcp_nodelay = NGX_TCP_NODELAY_SET; } //得到将要发送的数据的大小 n = u->buffer.last – u->buffer.pos; if (n) { //注意这里,可以看到buffer被reset了。 u->buffer.last = u->buffer.pos; //设置将要发送的数据大小 u->state->response_length += n; //调用input filter if (u->input_filter(u->input_filter_ctx, n) == NGX_ERROR) { ngx_http_upstream_finalize_request(r, u, 0); return; } //最终开始发送数据到downstream ngx_http_upstream_process_non_buffered_downstream(r); } else { //说明buffer是空 u->buffer.pos = u->buffer.start; u->buffer.last = u->buffer.start; //此时刷新数据到client if (ngx_http_send_special(r, NGX_HTTP_FLUSH) == NGX_ERROR) { ngx_http_upstream_finalize_request(r, u, 0); return; } //如果可读,则继续读取upstream的数据. if (u->peer.connection->read->ready) { ngx_http_upstream_process_non_buffered_upstream(r, u); } } return; }
上面的部分我们有2个函数需要详细分析下,一个是input filter的hook,一个是ngx_http_upstream_process_non_buffered_downstream,一个个来,先是input filter的book。
u->input_filter hook主要是对upstream发送的body进行一些处理,类似body filter, 上面的分析中我们可以看到当调用u->input_filter之前将u->buffer.last重置为pos,这个做法我有些不太理解, 我的猜测是让代码更清晰一些,因为在u->input_filter中我们会真正更新u->buffer.last.
在u->input_filter中,主要是会分配一个chain,然后挂载到u->out_bufs上,因为最终nginx会发送u->out_bufs这个chain(后面的代码会看到).并且u->buffer的last也会被更新,我们来看使用最多,也就是默认的u->input_filter的实现:
1
2
3
4
5
6
7
8
9
10
11
12
13
14
15
16
17
18
19
20
21
22
23
24
25
26
27
28
29
30
31
32
33
34
35
36
37
38
39
40
41
42
43
44
45
46
47
48
49
50
51
52
53
54
55
56
57
58
59
60
61
62
63
64
65
66
67
68
static ngx_int_t ngx_http_upstream_non_buffered_filter(void *data, ssize_t bytes) { ngx_http_request_t *r = data; ngx_buf_t *b; ngx_chain_t \*cl, \**ll; ngx_http_upstream_t *u; u = r->upstream; //遍历u->out_bufs for (cl = u->out_bufs, ll = &u->out_bufs; cl; cl = cl->next) { ll = &cl->next; } cl = ngx_chain_get_free_buf(r->pool, &u->free_bufs); if (cl == NULL) { return NGX_ERROR; } *ll = cl; cl->buf->flush = 1; cl->buf->memory = 1; //取出将要发送的buffer b = &u->buffer; cl->buf->pos = b->last; //更新last b->last += bytes; cl->buf->last = b->last; cl->buf->tag = u->output.tag; //u->length表示将要发送的数据大小(content_length)如果为NGX_MAX_SIZE_T_VALUE,则说明后端协议并没有指定需要发送的大小,此时我们只需要发送我们接收到的. if (u->length == NGX_MAX_SIZE_T_VALUE) { return NGX_OK; } //更新将要发送的数据大小 u->length -= bytes; return NGX_OK; }
然后就是ngx_http_upstream_process_non_buffered_downstream函数,这个函数用于非buffering状态下发送数据给client,它会调用ngx_http_upstream_process_non_buffered_request来发送数据,因此我们就来详细分析这个函数.
这个函数有两个参数,其中第二个do_write表示是否需要立即发送数据.
主要来看这个函数的下面这部分,这部分主要是调用ngx_http_output_filter输出给body filter,然后根据返回值来更新busy_bufs(没有发送完毕,则保存未发送完毕的bufer到busy),可以看到和http部分的处理很类似.
1
2
3
4
5
6
7
8
9
10
11
12
13
14
15
16
17
18
19
20
21
22
23
24
25
26
27
28
29
30
31
32
33
34
35
36
37
38
39
40
41
42
43
44
45
46
47
48
49
50
51
52
53
54
55
56
57
58
59
60
61
62
63
64
65
66
67
68
69
70
71
72
73
74
75
76
77
78
79
80
81
82
83
84
85
86
87
88
89
90
91
92
93
94
95
96
97
98
99
100
101
102
103
104
105
106
107
108
109
110
111
112
113
114
b = &u->buffer; do_write = do_write || u->length == 0; for ( ;; ) { if (do_write) { //如果u->out_bufs不为NULL则说明有需要发送的数据,如果u->busy_bufs,则说明上次有未发送完毕的数据. if (u->out_bufs || u->busy_bufs) { rc = ngx_http_output_filter(r, u->out_bufs); if (rc == NGX_ERROR) { ngx_http_upstream_finalize_request(r, u, 0); return; } //更新busy chain ngx_chain_update_chains(&u->free_bufs, &u->busy_bufs, &u->out_bufs, u->output.tag); } //这里说明想要发送的数据都已经发送完毕 if (u->busy_bufs == NULL) { //length为0,说明后端这次要发送的数据已经发送完毕 if (u->length == 0 || upstream->read->eof || upstream->read->error) { //此时finalize request,结束这次请求 ngx_http_upstream_finalize_request(r, u, 0); return; } //否则重置u->buffer,以便与下次使用 b->pos = b->start; b->last = b->start; } } //得到当前buf的剩余空间 size = b->end – b->last; //设置size为将要使用的buffer大小 if (size > u->length) { size = u->length; } //如果还有数据需要接受,并且upstream可读,则读取数据 if (size && upstream->read->ready) { n = upstream->recv(upstream, b->last, size); if (n == NGX_AGAIN) { break; } if (n > 0) { u->state->response_length += n; //再次调用input_filter,这里没有reset u->buffer.last,这是因为我们这个值并没有更新. if (u->input_filter(u->input_filter_ctx, n) == NGX_ERROR) { ngx_http_upstream_finalize_request(r, u, 0); return; } } //设置do_write,然后发送数据. do_write = 1; continue; } break; }
这个函数剩下部分就很简单了,就是挂载事件,删除定时器等一系列操作。
然后我们来看nginx最复杂的一块代码,也就是使用了buffering标记的条件下,nginx如何处理.
这里有一个核心的数据结构ngx_event_pipe_s。接下来,我们就来分析这个结构.
1
2
3
4
5
6
7
8
9
10
11
12
13
14
15
16
17
18
19
20
21
22
23
24
25
26
27
28
29
30
31
32
33
34
35
36
37
38
39
40
41
42
43
44
45
46
47
48
49
50
51
52
53
54
55
56
57
58
59
60
61
62
63
64
65
66
67
68
69
70
71
72
73
74
75
76
77
78
79
80
81
82
83
84
85
86
87
88
89
90
91
92
93
94
95
96
97
98
99
100
101
102
103
104
105
106
107
108
109
110
111
112
113
114
115
116
117
118
struct ngx_event_pipe_s { //表示nginx和client,以及和后端的两条连接 ngx_connection_t *upstream; ngx_connection_t *downstream; //保存了从upstream读取的数据(没有经过任何处理的),以及缓存的buf. ngx_chain_t *free_raw_bufs; ngx_chain_t *in; ngx_chain_t **last_in; //buf到tempfile的数据会放到out中 ngx_chain_t *out; ngx_chain_t **last_out; ngx_chain_t *free; ngx_chain_t *busy; /* * the input filter i.e. that moves HTTP/1.1 chunks * from the raw bufs to an incoming chain */ ngx_event_pipe_input_filter_pt input_filter; void *input_ctx; //这个filter就是输出内容到client的函数,一般设置为ngx_chain_writer ngx_event_pipe_output_filter_pt output_filter; void *output_ctx; //一些状态以及属性 unsigned read:1; unsigned cacheable:1; unsigned single_buf:1; unsigned free_bufs:1; unsigned upstream_done:1; unsigned upstream_error:1; unsigned upstream_eof:1; unsigned upstream_blocked:1; unsigned downstream_done:1; unsigned downstream_error:1; unsigned cyclic_temp_file:1; //配合bufs使用,表示已经分配了的buf的个数 ngx_int_t allocated; //对应xxx_buffers,也就是读取后端的数据时的bufer大小以及个数 ngx_bufs_t bufs; ngx_buf_tag_t tag; ssize_t busy_size; off_t read_length; //cache相关,max_temp_file_size表示最大的temp file的大小,temp_file_write_size表示buf将会flush到temp file中的大小. off_t max_temp_file_size; ssize_t temp_file_write_size; //网络相关的参数,定时器,以及lowat ngx_msec_t read_timeout; ngx_msec_t send_timeout; ssize_t send_lowat; ngx_pool_t *pool; ngx_log_t *log; //预读的buf以及大小,这里预读是指已经从upstream读取了的buf. ngx_chain_t *preread_bufs; size_t preread_size; //cache相关表示将要cache到文件的buf ngx_buf_t *buf_to_file; //cache相关,表示temp file ngx_temp_file_t *temp_file; /\* STUB \*/ int num; };
然后就是ngx_http_upstream_send_response的剩余部分,这部分主要是初始化event pipe结构.
1
2
3
4
5
6
7
8
9
10
11
12
13
14
15
16
17
18
19
20
21
22
23
24
25
26
27
28
29
30
31
32
33
34
35
36
37
38
39
40
41
42
43
44
45
46
47
48
49
50
51
52
53
54
55
56
57
58
59
60
61
62
63
64
65
66
67
68
69
70
71
72
73
74
75
76
77
78
79
80
81
82
83
84
85
86
87
88
89
90
91
92
93
94
95
96
97
98
99
100
101
102
103
104
105
106
107
108
109
110
111
112
113
114
115
116
117
118
119
120
121
122
123
124
125
126
127
128
129
130
131
132
133
134
135
136
137
138
139
140
141
142
143
144
145
146
147
148
149
150
151
152
153
154
155
156
157
158
159
160
161
162
163
164
165
166
167
168
169
170
171
172
173
174
175
176
p = u->pipe; //设置filter,可以看到就是http的输出filter p->output_filter = (ngx_event_pipe_output_filter_pt) ngx_http_output_filter; p->output_ctx = r; p->tag = u->output.tag; //设置bufs,它就是upstream中设置的bufs p->bufs = u->conf->bufs; //busy buffers的大小 p->busy_size = u->conf->busy_buffers_size; //upstream p->upstream = u->peer.connection; p->downstream = c; p->pool = r->pool; p->log = c->log; //设置是否需要cache p->cacheable = u->cacheable || u->store; //初始化temp_file p->temp_file = ngx_pcalloc(r->pool, sizeof(ngx_temp_file_t)); if (p->temp_file == NULL) { ngx_http_upstream_finalize_request(r, u, 0); return; } p->temp_file->file.fd = NGX_INVALID_FILE; p->temp_file->file.log = c->log; p->temp_file->path = u->conf->temp_path; p->temp_file->pool = r->pool; if (p->cacheable) { p->temp_file->persistent = 1; } else { p->temp_file->log_level = NGX_LOG_WARN; p->temp_file->warn = "an upstream response is buffered " "to a temporary file"; } //temp file的相关设置 p->max_temp_file_size = u->conf->max_temp_file_size; p->temp_file_write_size = u->conf->temp_file_write_size; //初始化preread bufs p->preread_bufs = ngx_alloc_chain_link(r->pool); if (p->preread_bufs == NULL) { ngx_http_upstream_finalize_request(r, u, 0); return; } p->preread_bufs->buf = &u->buffer; p->preread_bufs->next = NULL; u->buffer.recycled = 1; p->preread_size = u->buffer.last – u->buffer.pos; //设置cache相关 if (u->cacheable) { p->buf_to_file = ngx_calloc_buf(r->pool); if (p->buf_to_file == NULL) { ngx_http_upstream_finalize_request(r, u, 0); return; } p->buf_to_file->pos = u->buffer.start; p->buf_to_file->last = u->buffer.pos; p->buf_to_file->temporary = 1; } if (ngx_event_flags & NGX_USE_AIO_EVENT) { /\* the posted aio operation may currupt a shadow buffer \*/ p->single_buf = 1; } /\* TODO: p->free_bufs = 0 if use ngx_create_chain_of_bufs() \*/ p->free_bufs = 1; /* * event_pipe would do u->buffer.last += p->preread_size * as though these bytes were read */ u->buffer.last = u->buffer.pos; if (u->conf->cyclic_temp_file) { /* * we need to disable the use of sendfile() if we use cyclic temp file * because the writing a new data may interfere with sendfile() * that uses the same kernel file pages (at least on FreeBSD) */ p->cyclic_temp_file = 1; c->sendfile = 0; } else { p->cyclic_temp_file = 0; } //事件相关的初始化 p->read_timeout = u->conf->read_timeout; p->send_timeout = clcf->send_timeout; p->send_lowat = clcf->send_lowat; //挂载读写回调函数,这里注意一个是upstream的读回调,一个是r(client)的写回调 u->read_event_handler = ngx_http_upstream_process_upstream; r->write_event_handler = ngx_http_upstream_process_downstream; //进入upstream的操作 ngx_http_upstream_process_upstream(r, u);
通过上面我们可以看到主要操作都在两个回调函数中,一个是upstream的读handler,一个是downstream的写handler,我们一个个看,先来看upstream的读handler。
这个函数首先会判断是否超时,如果超时则设置错误,否则调用ngx_event_pipe进入pipe的读处理,然后调用ngx_http_upstream_process_request对upstream进行处理,比如退出等一系列操作,因此这里最核心的函数就是ngx_event_pipe。
1
2
3
4
5
6
7
8
9
10
11
12
13
14
15
16
17
18
19
20
21
22
23
24
25
26
27
28
29
30
31
32
33
34
35
36
37
38
39
40
41
42
43
44
static void ngx_http_upstream_process_upstream(ngx_http_request_t *r, ngx_http_upstream_t *u) { ngx_connection_t *c; c = u->peer.connection; ngx_log_debug0(NGX_LOG_DEBUG_HTTP, c->log, 0, "http upstream process upstream"); c->log->action = "reading upstream"; //判断超时 if (c->read->timedout) { u->pipe->upstream_error = 1; ngx_connection_error(c, NGX_ETIMEDOUT, "upstream timed out"); } else { //调用event_pipe进对读取数据进行处理. if (ngx_event_pipe(u->pipe, 0) == NGX_ABORT) { ngx_http_upstream_finalize_request(r, u, 0); return; } } ngx_http_upstream_process_request(r); }
然后来看ngx_event_pipe的源代码,ngx_event_pipe第二个参数是do_write,表示是否需要将数据立即写到downstream,也就是client.
1
2
3
4
5
6
7
8
9
10
11
12
13
14
15
16
17
18
19
20
21
22
23
24
25
26
27
28
29
30
31
32
33
34
35
36
37
38
39
40
41
42
43
44
45
46
47
48
49
50
51
52
53
54
55
56
57
58
59
60
61
62
63
64
65
66
67
68
69
70
71
72
73
74
75
76
77
78
79
80
81
82
83
84
85
86
87
88
89
90
91
92
93
94
95
96
97
98
99
100
101
102
103
104
105
106
107
108
109
110
111
112
113
114
115
116
117
118
119
120
121
122
123
124
ngx_int_t ngx_event_pipe(ngx_event_pipe_t *p, ngx_int_t do_write) { u_int flags; ngx_int_t rc; ngx_event_t \*rev, \*wev; for ( ;; ) { //判断是否需要将数据写到downstream. if (do_write) { p->log->action = "sending to client"; //写数据到downstream rc = ngx_event_pipe_write_to_downstream(p); if (rc == NGX_ABORT) { return NGX_ABORT; } if (rc == NGX_BUSY) { return NGX_OK; } } p->read = 0; p->upstream_blocked = 0; p->log->action = "reading upstream"; //读取数据 if (ngx_event_pipe_read_upstream(p) == NGX_ABORT) { return NGX_ABORT; } //判断是否需要退出循环,p->read表示是否已经读取了upstream的数据,upstream_blocked表示是否downstream可写(后面代码会看到这两个变量的设置) if (!p->read && !p->upstream_blocked) { break; } //可以看到如果读取了数据就准备写数据到downstream do_write = 1; } //判断是否需要挂载读事件 if (p->upstream->fd != -1) { rev = p->upstream->read; flags = (rev->eof || rev->error) ? NGX_CLOSE_EVENT : 0; if (ngx_handle_read_event(rev, flags) != NGX_OK) { return NGX_ABORT; } if (rev->active && !rev->ready) { ngx_add_timer(rev, p->read_timeout); } else if (rev->timer_set) { ngx_del_timer(rev); } } //挂载写事件。 if (p->downstream->fd != -1 && p->downstream->data == p->output_ctx) { wev = p->downstream->write; if (ngx_handle_write_event(wev, p->send_lowat) != NGX_OK) { return NGX_ABORT; } if (!wev->delayed) { if (wev->active && !wev->ready) { ngx_add_timer(wev, p->send_timeout); } else if (wev->timer_set) { ngx_del_timer(wev); } } } return NGX_OK; }
通过上面的代码我们能看到核心的函数有这么2个,分别是ngx_event_pipe_read_upstream和ngx_event_pipe_write_to_downstream,这两个 一个是从后端都数据,一个是发送数据到前端。其中read最为复杂,因此我们先来看read回调,这个函数比较长,我们一段段的来。
先来看这个函数的一个基本结构:
这个函数的主要处理都在一个for循环里面,这个for循环比较长,因此我们就来分段分析这个for循环。这个for循环的主要作用就是从后端读取数据。
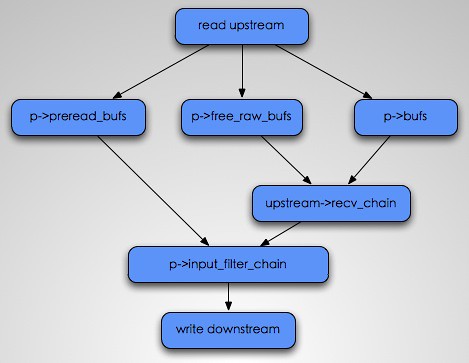
因此它首先需要做的就是分配buf,以便于从后端接收数据,可是如果第一次我们接收头的时候,多接收了一些buf,此时我们就先处理这部分buf,然后再接收新的buf.
下面这段主要是进行状态判断,以及当preread_bufs存在的情况的操作。
1
2
3
4
5
6
7
8
9
10
11
12
13
14
15
16
17
18
19
20
21
22
23
24
25
26
27
28
29
30
31
32
33
34
35
36
37
38
39
40
41
42
43
44
45
46
47
48
//判断upstream的状态 if (p->upstream_eof || p->upstream_error || p->upstream_done) { break; } //如果preread_bufs为空(上面的初始化中这个buf也就是upstream读取头的时候,解析完头,然后剩余的buf),并且upstream并不可读,此时则说明对数据也没有任何操作和读取的必要,因此退出循环. if (p->preread_bufs == NULL && !p->upstream->read->ready) { break; } //如果preread_bufs存在 if (p->preread_bufs) { /\* use the pre-read bufs if they exist \*/ //使用preread_bufs chain = p->preread_bufs; //可以看到设置preread_bufs为空,这样子,下次循环,则会进入另外的处理,也就是需要从upstream读取数据 p->preread_bufs = NULL; //n也就是u->buf的大小 n = p->preread_size; ngx_log_debug1(NGX_LOG_DEBUG_EVENT, p->log, 0, "pipe preread: %z", n); if (n) { //设置read,也就是当前upstream中存在读取还没发送的数据. p->read = 1; } }
然后下面这段代码就是当p->preread_bufs为空的情况,此时就需要从upstream来读取数据,而读取之前则需要分配buf,以供upstream使用,因此下面这段代码,就是用来分配buf的。
1
2
3
4
5
6
7
8
9
10
11
12
13
14
15
16
17
18
19
20
21
22
23
24
25
26
27
28
29
30
31
32
33
34
35
36
37
38
39
40
41
42
43
44
45
46
47
48
49
50
51
52
53
54
55
56
57
58
59
60
61
62
63
64
65
66
67
68
69
70
71
72
73
74
75
76
77
78
79
80
81
82
83
84
85
86
87
88
89
90
91
92
93
94
95
96
97
98
99
100
101
102
103
104
105
106
107
108
109
110
111
112
113
114
115
116
117
118
119
120
121
122
123
124
125
126
127
128
129
130
131
132
133
134
135
136
137
138
139
140
141
142
143
144
145
146
147
148
149
150
151
152
153
154
155
156
157
158
159
160
161
162
163
164
165
166
167
168
169
170
171
172
173
174
175
176
177
178
179
180
181
182
183
184
185
186
187
188
189
190
191
192
193
194
195
196
197
198
199
200
201
202
203
204
205
206
else { //首先是看free_raw_bufs是否存在,如果存在,则直接使用它。 if (p->free_raw_bufs) { /\* use the free bufs if they exist \*/ chain = p->free_raw_bufs; if (p->single_buf) { p->free_raw_bufs = p->free_raw_bufs->next; chain->next = NULL; } else { p->free_raw_bufs = NULL; } } else if (p->allocated < p->bufs.num) { //如果free_raw_bufs不存在,并且分配的buf数量没有超过bufs的个数,此时则创建新的buf /\* allocate a new buf if it’s still allowed \*/ b = ngx_create_temp_buf(p->pool, p->bufs.size); if (b == NULL) { return NGX_ABORT; } p->allocated++; chain = ngx_alloc_chain_link(p->pool); if (chain == NULL) { return NGX_ABORT; } chain->buf = b; chain->next = NULL; } else if (!p->cacheable && p->downstream->data == p->output_ctx && p->downstream->write->ready && !p->downstream->write->delayed) { //如果已经分配的bufs的个数大于预设定的个数,并且没有打开cache,而且downstream可写,则设置upstream_blocked,准备写数据到upstream(这个是为了发送数据之后,数据buf能够被使用读) p->upstream_blocked = 1; ngx_log_debug0(NGX_LOG_DEBUG_EVENT, p->log, 0, "pipe downstream ready"); break; } else if (p->cacheable || p->temp_file->offset < p->max_temp_file_size) { //到达这里有两个情况,一个是cacheable打开,一个是当buf不够用了,此时就会将一部分数据buf到temp file中。这个函数我下篇blog会详细分析,这次之需要知道这个将会将数据buf到temp file,然后绑定到p->out中。 rc = ngx_event_pipe_write_chain_to_temp_file(p); ngx_log_debug1(NGX_LOG_DEBUG_EVENT, p->log, 0, "pipe temp offset: %O", p->temp_file->offset); //处理返回值 if (rc == NGX_BUSY) { break; } if (rc == NGX_AGAIN) { if (ngx_event_flags & NGX_USE_LEVEL_EVENT && p->upstream->read->active && p->upstream->read->ready) { if (ngx_del_event(p->upstream->read, NGX_READ_EVENT, 0) == NGX_ERROR) { return NGX_ABORT; } } } if (rc != NGX_OK) { return rc; } //说明写成功,此时free_raw_bufs已经被重新赋值,也就是我们可以使用,所以类似上面free_raw_bufs存在的处理 chain = p->free_raw_bufs; if (p->single_buf) { p->free_raw_bufs = p->free_raw_bufs->next; chain->next = NULL; } else { p->free_raw_bufs = NULL; } } else { /\* there are no bufs to read in \*/ ngx_log_debug0(NGX_LOG_DEBUG_EVENT, p->log, 0, "no pipe bufs to read in"); break; } //开始从后端读取数据,可以看到数据被读取进chain,n表示读到的字节数 n = p->upstream->recv_chain(p->upstream, chain); ngx_log_debug1(NGX_LOG_DEBUG_EVENT, p->log, 0, "pipe recv chain: %z", n); //如果将chain添加到free_raw_bufs的开头 if (p->free_raw_bufs) { chain->next = p->free_raw_bufs; } p->free_raw_bufs = chain; //设置error if (n == NGX_ERROR) { p->upstream_error = 1; return NGX_ERROR; } if (n == NGX_AGAIN) { if (p->single_buf) { ngx_event_pipe_remove_shadow_links(chain->buf); } break; } //设置read,表示已经读取了数据 p->read = 1; //如果返回0,则说明对端关闭了连接 if (n == 0) { p->upstream_eof = 1; break; } }
然后就是for循环的最后一段,到达这一段说明从后端的数据已经读取到了chain中,然后n为已经读取的数据,于是开始遍历已经读取的chain。
它会遍历chain,然后调用input_filter来将buf拷贝到 p->in/last_in 中,最后将chain free掉。这里buf 会有一个shadow 的域,在遍历chain的时候,需要将对应buf的shadow删除掉。
对于shadow域我是这么理解的,就是每次我们在input_filter中拷贝cl->buf的域到p->in/last_in的buf域的时候,也就是制造了一个cl->buf的影子,而他们是共享对应的内存。此时这两个buf就是互相shadow的。他们的shadow域都是指向对方。不过这个域我觉得并不是很必须,上次在邮件列表也看到igor说不喜欢这东西,不过不知道什么时候能删掉它.
1
2
3
4
5
6
7
8
9
10
11
12
13
14
15
16
17
18
19
20
21
22
23
24
25
26
27
28
29
30
31
32
33
34
35
36
37
38
39
40
41
42
43
44
45
46
47
48
49
50
51
52
53
54
55
56
57
58
59
60
61
62
63
64
65
66
67
68
69
70
71
72
//更新已经读取了的字节数 p->read_length += n; cl = chain; p->free_raw_bufs = NULL; //开始遍历chain, while (cl && n > 0) { //首先remove shadow buf ngx_event_pipe_remove_shadow_links(cl->buf); //得到当前的chain buf的空间大小(因为读取数据,是从cl->buf->last开始的) size = cl->buf->end – cl->buf->last; //如果已经读取的字节数大于等于chain buf,则对当前的buf进行更新。 if (n >= size) { //更新last cl->buf->last = cl->buf->end; /\* STUB \*/ cl->buf->num = p->num++; //调用input_filter if (p->input_filter(p, cl->buf) == NGX_ERROR) { return NGX_ABORT; } //更新n/cl 最终free chain n -= size; ln = cl; cl = cl->next; ngx_free_chain(p->pool, ln); } else { //否则则说明当前的chain是最后一个chain,因此更新last,然后设置n,以便与退出循环。这里要注意,可以看到nginx并没有调用input_filter,这是因为,nginx会尽量的使cl->buf最大情况下调用p->input_filter,不过这里会有个问题,当cl->buf没有最大,此时后端断开连接,这时就会少调用一次p->input_filter.不过nginx在最后会处理这个问题的。 cl->buf->last += n; n = 0; } } //如果cl还存在,则说明我们开始设置的chain,只有一部分被使用了,因此此时将这写chain保存到free_raw_bufs中。可以看到如果chain只有一部分被使用,然后当再次循环,则使用的chain会直接使用free_raw_bufs,也就是我们前一次没有使用完全的chain if (cl) { for (ln = cl; ln->next; ln = ln->next) { /\* void \*/ } ln->next = p->free_raw_bufs; p->free_raw_bufs = cl; }
上面的p->input_filter我们后面再分析,先来看函数剩余的部分剩余的这一部分主要是处理free_raw_bufs,调用p->input_filter,将free_raw_bufs中的数据保存发送chain中,这个就是为了解决前面少调用一次p->input_filter的情况。
1
2
3
4
5
6
7
8
9
10
11
12
13
14
15
16
17
18
19
20
21
22
23
24
25
26
27
28
29
30
31
32
33
34
35
36
37
38
39
40
41
42
43
44
if ((p->upstream_eof || p->upstream_error) && p->free_raw_bufs) { /\* STUB \*/ p->free_raw_bufs->buf->num = p->num++; //调用input_filter. if (p->input_filter(p, p->free_raw_bufs->buf) == NGX_ERROR) { return NGX_ABORT; } p->free_raw_bufs = p->free_raw_bufs->next; //遍历,然后 if (p->free_bufs && p->buf_to_file == NULL) { for (cl = p->free_raw_bufs; cl; cl = cl->next) { if (cl->buf->shadow == NULL) { ngx_pfree(p->pool, cl->buf->start); } } } } //如果cache打开,并且p->in存在(也就是有读取的数据),则写数据到temp file。 if (p->cacheable && p->in) { if (ngx_event_pipe_write_chain_to_temp_file(p) == NGX_ABORT) { return NGX_ABORT; } }
然后来看p->input_filter的实现,这里我们就来分析,nginx默认实现的一个ngx_event_pipe_copy_input_filter,其中proxy等模块都是调用这个filter。它主要是拷贝buf(不是buf的内容,只是buf的属性)到p->in或者p->last_in,这两个域都是用来和write数据的时候交互用的。这两个域的区别是这样子的
p->in只能保存一个chain,而p->in这条链上的剩余的chain都保存在p->last_in中,这么做的原因还不太清楚,而且搜索了下代码,last_in也没有被使用到.
1
2
3
4
5
6
7
8
9
10
11
12
13
14
15
16
17
18
19
20
21
22
23
24
25
26
27
28
29
30
31
32
33
34
35
36
37
38
39
40
41
42
43
44
45
46
47
48
49
50
51
52
53
54
55
56
57
58
59
60
61
62
63
64
65
66
67
68
69
70
71
72
73
74
75
76
77
78
79
80
81
82
83
84
85
86
87
88
ngx_int_t ngx_event_pipe_copy_input_filter(ngx_event_pipe_t \*p, ngx_buf_t \*buf) { ngx_buf_t *b; ngx_chain_t *cl; if (buf->pos == buf->last) { return NGX_OK; } //如果free存在,则从free中取得缓存的buf if (p->free) { cl = p->free; b = cl->buf; p->free = cl->next; ngx_free_chain(p->pool, cl); } else { //否则分配buf b = ngx_alloc_buf(p->pool); if (b == NULL) { return NGX_ERROR; } } //拷贝buf的属性 ngx_memcpy(b, buf, sizeof(ngx_buf_t)); b->shadow = buf; b->tag = p->tag; b->last_shadow = 1; b->recycled = 1; buf->shadow = b; //分配chain cl = ngx_alloc_chain_link(p->pool); if (cl == NULL) { return NGX_ERROR; } cl->buf = b; cl->next = NULL; ngx_log_debug1(NGX_LOG_DEBUG_EVENT, p->log, 0, "input buf #%d", b->num); if (p->in) { *p->last_in = cl; } else { p->in = cl; } p->last_in = &cl->next; return NGX_OK; }
这次就分析到这里,下次将会分析upstream的数据发送的部分。